Are you ready to make your food last longer, save money, and reduce waste? Using a FoodSaver vacuum sealer is one of the smartest moves you can make in your kitchen.
But if you’re new to vacuum sealing, it might seem a bit tricky at first. Don’t worry—this guide will walk you through every simple step to get the most out of your FoodSaver vacuum sealer. From sealing fresh produce to preserving leftovers, you’ll learn easy tips that anyone can follow.
Keep reading, and you’ll discover how to turn your FoodSaver into your best kitchen helper.
Choosing The Right Foodsaver Model
Choosing the right FoodSaver model is important for effective food storage. Different models offer various features that suit different needs. Picking the correct one helps save time and ensures food stays fresh longer.
Understanding Your Storage Needs
Think about the types of food you want to seal. Some models work better for meats, while others handle dry goods well. Choose a model that matches your common food storage habits.
Considering Size And Capacity
FoodSaver models vary in size and bag capacity. Smaller models fit tight spaces and seal smaller bags. Larger models can handle bigger bags and frequent use. Pick a size that fits your kitchen and sealing volume.
Evaluating Features And Attachments
Some models include extra tools like handheld sealers or hose attachments. These help seal jars or containers. Decide if you need these extras for more versatile sealing options.
Checking Budget And Warranty
Prices differ based on features and brand reputation. Set a budget before choosing. Look for a model with a good warranty to protect your purchase over time.
Setting Up Your Vacuum Sealer
Setting up your FoodSaver vacuum sealer is simple and quick. Proper setup ensures the machine works effectively. Follow the steps carefully for the best results.
Unboxing And Inspecting Your Vacuum Sealer
Take the vacuum sealer out of the box. Check for any visible damage or missing parts. Make sure the power cord and accessories are included. This step helps avoid issues later.
Placing The Vacuum Sealer On A Flat Surface
Find a clean, flat surface for your vacuum sealer. A stable spot prevents the machine from moving during use. Keep it near an electrical outlet for easy plug-in.
Plugging In And Powering On
Plug the vacuum sealer into a nearby outlet. Press the power button to turn it on. You may hear a beep or see a light indicating it is ready.
Inserting The Vacuum Bag Or Roll
Use a vacuum bag or roll designed for FoodSaver. Place the open end of the bag into the vacuum channel. Align it properly to ensure a tight seal.
Checking The Drip Tray And Accessories
Locate the drip tray under the sealing area. Make sure it is clean and securely in place. Attach any additional tools if your model includes them.
Selecting Vacuum Bags And Rolls
Choosing the right vacuum bags and rolls is key to using a FoodSaver vacuum sealer well. The bags keep food fresh by blocking air and moisture. Different foods need different bags. Using the correct type helps keep food safe and tasty longer.
Selecting The Right Size
Vacuum bags and rolls come in many sizes. Choose a size that fits the food comfortably. Too large bags waste space and seal poorly. Rolls allow custom bag sizes. Cut the roll to fit small or large items.
Types Of Vacuum Bags
There are pre-cut bags and rolls. Pre-cut bags are ready to use and come in standard sizes. Rolls give flexibility to create bags of any length. Both types work well but rolls offer more options.
Material And Thickness
Bags vary in thickness and material. Thicker bags resist punctures from sharp foods. Look for BPA-free and food-safe materials. Thicker bags seal better and last longer in the freezer.
Compatibility With Food Types
Some bags are designed for dry foods only. Others work for moist or wet foods. Choose bags labeled for wet food for meats or soups. This prevents leaks and ensures a tight seal.
Storage And Reuse
Vacuum bags can sometimes be reused if cleaned properly. Avoid reusing if the bag shows damage or food residue. Store unused bags in a cool, dry place to keep them fresh and ready.
Preparing Food For Sealing
Preparing food correctly before sealing is key to getting the best results. Clean and dry your food to prevent bacteria growth. Moisture can stop the vacuum sealer from working well.
Cut large items into smaller portions. This helps the food freeze and thaw evenly. It also makes storage easier and more space-efficient.
Cleaning And Drying Food
Wash fruits and vegetables under cold water to remove dirt. Pat them dry with a clean towel before sealing. For meats, trim excess fat to avoid leakage. Excess moisture can weaken the seal and spoil the food faster.
Portioning Food Into Sizes
Divide food into meal-sized portions. Use smaller pieces to fit the bags properly. This prevents air pockets and keeps the seal tight. Smaller packages also help thaw food faster and reduce waste.
Pre-freezing Soft Or Wet Foods
Freeze soft or wet foods like berries or marinated meat for a few hours first. This makes them firm and easier to vacuum seal. It stops the bags from getting sucked into the machine during sealing.
Using Paper Towels For Extra Protection
Place a paper towel inside the bag with juicy foods. This absorbs extra moisture during sealing. It helps keep the seal strong and prevents leaks. Replace the towel before freezing to avoid sogginess.
Sealing Dry Foods
Sealing dry foods with a FoodSaver vacuum sealer keeps them fresh longer. It removes air, which slows down spoilage and keeps flavors intact. You can seal nuts, grains, spices, and snacks easily.
Using the right technique ensures the best seal and food protection. Follow simple steps to get a strong, airtight seal every time.
Preparing Dry Foods For Sealing
Make sure dry foods are clean and completely dry. Moisture can stop the vacuum sealer from working well. Use a paper towel to remove any dust or crumbs.
Fill the bag but leave enough space at the top for sealing. Avoid overfilling to prevent food from blocking the sealing strip.
Choosing The Right Bag Or Roll
Select FoodSaver bags or rolls designed for dry foods. These are made to seal tightly and prevent air leaks. Cut the roll to the size you need and seal one end before filling.
Sealing Dry Foods Step-by-step
Place the open end of the bag into the vacuum channel. Close the lid and lock it to start sealing. Press the vacuum and seal button to remove air and seal the bag.
Wait for the machine to finish before opening. Check the seal to make sure it is tight with no wrinkles or gaps.
Tips For Best Results
Seal small portions to keep food fresh once opened. Avoid sharp-edged items that can puncture the bag. Store sealed bags in a cool, dry place.
Do not reuse bags that have lost their seal. Use fresh bags for each sealing to keep food safe and fresh longer.
Sealing Moist Or Wet Foods
Sealing moist or wet foods with a FoodSaver vacuum sealer requires special care. Moisture can affect the seal quality and cause the machine to stop. Proper preparation helps keep the food fresh and the seal strong. Follow these tips to vacuum seal wet items successfully.
Choose The Right Bag Type
Select bags designed for moist foods or wet sealing. These bags have a textured surface to allow air removal. Avoid using regular smooth bags, as they can cause sealing errors with moisture inside.
Pre-freeze Wet Foods
Place wet foods in the freezer for 1-2 hours before sealing. This firms up the surface moisture, preventing liquid from being sucked into the sealing area. Pre-freezing makes the sealing process smoother.
Use Paper Towels To Absorb Excess Liquid
Place a paper towel inside the bag to soak up extra moisture. This reduces wetness near the seal and stops leaks. Change the towel if it becomes too damp before sealing.
Seal With The Pulse Function
Use the vacuum sealer’s pulse or manual vacuum mode for moist foods. This lets you control suction and stop before liquids reach the sealing strip. It helps avoid messes and poor seals.
Clean The Sealing Area After Each Use
Wipe the sealing strip and surrounding area after sealing wet foods. Moisture buildup can cause future sealing problems. Keep the vacuum sealer clean and dry for best performance.
Using The Handheld Vacuum Sealer
The handheld vacuum sealer is a compact and handy tool for quick sealing jobs. It works well with pre-made bags or containers with special lids. This device helps keep food fresh by removing air and sealing it tightly. Using the handheld vacuum sealer saves space and reduces waste in your kitchen.
Preparing The Bag And Food
Start by placing your food inside a vacuum seal bag. Leave enough space at the top for sealing. Make sure the bag is clean and dry around the opening. Avoid overfilling to allow proper air removal. For liquids, freeze them first to prevent spills during sealing.
Attaching The Handheld Sealer
Connect the handheld vacuum sealer to the bag’s valve or opening. Press firmly to create a tight fit. Ensure there are no gaps where air can enter. Some models come with adapters for different bag types. Check your device manual for specific attachment tips.
Removing Air And Sealing
Turn on the handheld vacuum sealer to start removing air. Hold it steadily until you hear the sealing sound or see the indicator light. This usually takes a few seconds. Once the air is out, the sealer will automatically close the bag. Double-check the seal for any leaks or openings.
Storing And Cleaning The Sealer
Store the handheld vacuum sealer in a dry, cool place after use. Clean the sealing surface with a damp cloth to remove food residues. Avoid using harsh chemicals or submerging the device in water. Proper care extends the life of your sealer and keeps it ready for use.
Vacuum Sealing Custom Bag Sizes
Vacuum sealing custom bag sizes with a FoodSaver vacuum sealer gives flexibility. It allows you to create bags that fit your food perfectly. This method reduces waste and saves storage space. Using custom sizes also helps keep food fresh longer by removing excess air.
Understanding how to make and seal these bags properly improves your food storage. It ensures a tight seal and efficient vacuum process. Let’s explore the steps to vacuum seal custom bag sizes.
Choosing The Right Vacuum Roll
Select a vacuum roll designed for FoodSaver machines. Rolls come in different widths, usually 8 or 11 inches. Choose a width that matches the size of food you want to store. Make sure the roll is BPA-free for safe food storage.
Cutting The Bag To Size
Pull out the roll to the length needed for your food. Leave about 3 to 4 inches extra for sealing. Use sharp scissors to cut the plastic roll evenly. Straight edges help create a better seal.
Sealing One End Of The Bag
Place one open end of the cut plastic on the sealing strip. Close the vacuum sealer lid and lock it. Press the seal button to close the bag end. Wait until the seal light turns off before opening.
Filling The Bag With Food
Place your food inside the custom-sized bag. Do not overfill; leave space near the open end. This space is needed for the vacuum process. Arrange food flat for even sealing and better storage.
Vacuum Sealing The Bag
Place the open end of the bag into the vacuum channel. Close the lid and lock it securely. Press the vacuum and seal button. The machine will remove air and seal the bag tightly. Wait for the process to finish before opening.
Checking The Seal Quality
Inspect the sealed edge for a complete seal. It should be flat and without wrinkles or gaps. If the seal is weak, repeat the sealing step. Proper sealing prevents air from entering and keeps food fresh.
Avoiding Common Sealing Mistakes
Using a FoodSaver vacuum sealer can extend the life of your food and keep it fresh. Avoiding common sealing mistakes ensures your food stays protected. Simple errors can cause air leaks and spoilage. Learn how to prevent these problems with clear tips.
Check Bag Placement Carefully
Place the bag correctly inside the vacuum channel. The open end must lie flat and straight. Wrinkles or folds block air removal. Keep the bag away from the sealing strip. This helps create a strong, tight seal every time.
Keep The Sealing Area Clean
Wipe any moisture or food debris from the sealing strip. Wet or dirty areas cause poor seals. Use a dry cloth to clean the strip before sealing. This step prevents leaks and keeps the machine working well.
Avoid Overfilling The Bag
Do not fill bags too full. Leave space at the top for sealing. Overfilled bags stop the vacuum from pulling all air out. This reduces freshness and can break the seal. Fill bags only halfway or less for best results.
Use The Right Bag Size
Choose a bag size that fits your food with some extra room. Bags that are too large waste material and may not seal properly. Bags that are too small can burst during vacuuming. Match the bag size to your food for a secure seal.
Allow Liquids To Chill Before Sealing
Freeze or refrigerate liquids before sealing. Hot or warm liquids can be sucked into the machine. This can damage the vacuum sealer and cause poor seals. Cold liquids seal better and keep your machine safe.
Cleaning And Maintaining The Sealer
Cleaning and maintaining your FoodSaver vacuum sealer keeps it working well. Regular care prevents damage and extends its life. A clean sealer also ensures better sealing and food safety.
Cleaning The Exterior
Unplug the vacuum sealer before cleaning. Use a damp cloth with mild soap to wipe the outside. Avoid harsh chemicals or abrasive pads. Dry the surface with a soft cloth after cleaning.
Cleaning The Sealing Area
Open the lid to access the sealing strip and drip tray. Remove any food particles or liquid buildup carefully. Wipe the sealing strip gently with a damp cloth. Clean the drip tray by removing and washing it with warm soapy water. Make sure all parts are dry before reassembling.
Maintaining The Vacuum Pump
Check the vacuum pump area regularly for debris. Use a small brush or cloth to clean around the pump gently. Avoid using water directly on the pump. Keep the pump area dry to prevent damage.
Replacing The Sealing Strip And Gasket
Inspect the sealing strip and gasket often for wear or damage. Replace them if they show cracks or no longer seal tightly. FoodSaver offers replacement parts that fit your model. Follow the user manual for correct installation.
Storing Your Vacuum Sealer
Store the vacuum sealer in a dry, cool place. Keep it away from direct sunlight and heat sources. Close the lid loosely to avoid pressure on the sealing strip. Proper storage helps maintain the machine’s condition.
Vacuum Sealing For Freezer Storage
Vacuum sealing for freezer storage keeps food fresh longer and reduces waste. It removes air from the bag, which slows down spoilage and freezer burn. This method helps maintain the food’s color, texture, and flavor better than regular freezer bags.
Using a FoodSaver vacuum sealer is simple and effective for storing meats, vegetables, and leftovers. Proper sealing protects food from moisture loss and freezer odors. It also saves space by compressing the items tightly.
Preparing Food For Vacuum Sealing
Before sealing, make sure food is clean and dry. Cut large pieces into smaller portions for easier storage. Blanch vegetables to keep their color and texture. Cool cooked foods completely to avoid moisture inside the bag.
Choosing The Right Bags
Use bags made specifically for vacuum sealing. These bags are thicker and stronger than regular plastic bags. Choose the correct size to avoid wasting material. Bags with textured surfaces allow air to be removed efficiently.
Sealing And Vacuuming Process
Place the food inside the bag, leaving enough space at the top. Insert the open end of the bag into the vacuum sealer. Close the lid and lock it in place. Press the vacuum and seal button to start the process.
The machine removes all air, then seals the bag tightly. Check the seal to ensure it is secure with no gaps. If needed, repeat the sealing for extra protection.
Labeling And Storing Sealed Bags
Write the date and contents on each bag with a permanent marker. This helps track freshness and avoid confusion. Store vacuum-sealed bags flat in the freezer for easy stacking. Keep similar items together for quick access.

Credit: www.youtube.com
Resealing Snack And Chip Bags
Resealing snack and chip bags keeps your food fresh longer. It stops air and moisture from getting in. This helps keep snacks crunchy and tasty.
Using a FoodSaver vacuum sealer for resealing is easy. It creates a tight seal that locks out air. This method is better than clips or ties.
Preparing The Bag For Sealing
Flatten the open end of the snack bag. Remove any crumbs or loose pieces near the edge. This helps the sealer create a strong seal. Fold the bag to fit inside the vacuum channel. Make sure the opening is straight and smooth.
Using The Vacuum Sealer To Seal Bags
Place the open end of the bag in the vacuum channel. Close the lid securely. Press the seal button on the FoodSaver. The machine removes air and seals the bag shut. Wait until the sealing light turns off before opening.
Tips For Best Results
Avoid sealing bags with sharp chips near the opening. Sharp edges can puncture the bag. If the bag is too full, remove some contents first. Use a piece of parchment paper inside for greasy snacks. This stops the sealer from sticking to the food.
Vacuum Sealing Leftovers And Meal Prep
Vacuum sealing leftovers and meal prep foods is a smart way to keep meals fresh longer. It cuts down on food waste and saves money. Using a Foodsaver vacuum sealer helps lock in flavors and nutrients. It also stops freezer burn and keeps food textures intact.
Sealing your meals properly means they stay tasty and safe. You can prepare meals ahead and store them efficiently. This method works well for cooked dishes, raw ingredients, and snacks.
Preparing Leftovers For Vacuum Sealing
Cool leftovers before sealing to avoid steam inside the bag. Place the food flat in the vacuum bag for even sealing. Avoid overfilling the bag to ensure a tight seal. Cut large pieces into smaller portions for easier storage and thawing.
Using The Foodsaver Vacuum Sealer For Meal Prep
Fill bags with your planned meals or ingredients. Lay the open end of the bag inside the vacuum channel. Close the lid firmly to start the vacuum process. The machine removes air and seals the bag automatically.
Label each bag with the date and contents for easy tracking. Store sealed bags in the refrigerator or freezer depending on the food type.
Tips For Best Results With Vacuum Sealing
Use fresh or fully cooked foods for sealing. Avoid sealing liquids directly; freeze them first if needed. Keep the vacuum sealer clean to maintain strong suction. Use bags designed for vacuum sealing to prevent leaks.
Check seals for air pockets before storage. Properly sealed bags extend food shelf life and reduce odors.

Credit: www.youtube.com
Storing Fresh Produce With Vacuum Sealing
Storing fresh produce with a vacuum sealer keeps fruits and vegetables fresher longer. Vacuum sealing removes air, which slows down spoilage and mold growth. It also protects produce from freezer burn and dehydration. This method keeps the natural color, taste, and texture intact. Using a Foodsaver vacuum sealer for produce helps reduce food waste and saves money.
Preparing Produce For Vacuum Sealing
Wash and dry produce thoroughly before sealing. Remove any dirt or debris to prevent bacteria growth. Cut larger fruits or vegetables into smaller pieces. This helps with even sealing and storage. Blanch some vegetables like green beans or carrots for better preservation. Make sure produce is completely dry to avoid moisture inside the bag.
Choosing The Right Vacuum Bags
Use fresh produce-specific vacuum bags or rolls. These bags are designed to keep moisture balanced. Avoid using regular plastic bags as they may not seal well. Choose bags that fit the size of your produce. Leave some space at the top for proper sealing. Using the correct bag improves sealing efficiency and food safety.
Sealing Process For Fresh Produce
Place produce inside the vacuum bag without overcrowding. Lay the open end of the bag flat in the sealer’s sealing area. Close the lid firmly and start the vacuum process. The machine will remove air and seal the bag tightly. Check the seal to ensure no air leaks. Store sealed produce in the refrigerator or freezer depending on type.
Troubleshooting Sealing Issues
Sealing problems can slow down your FoodSaver vacuum sealer use. Fixing these issues keeps your food fresh longer. Most sealing troubles are easy to solve with quick checks and small adjustments.
Check Bag Placement And Size
Place the bag properly inside the sealer. The open end must lay flat on the sealing strip. Use bags that fit the machine size. Too small or too large bags can cause poor seals.
Clean The Sealing Strip And Gasket
Dirt or food scraps block the sealing strip. Wipe the strip with a damp cloth regularly. Make sure the rubber gasket inside the lid is clean and intact. A dirty or damaged gasket weakens the vacuum seal.
Remove Excess Moisture Before Sealing
Wet bags make sealing hard. Pat dry wet foods or freeze them first. Use paper towels inside the bag to absorb extra liquid. Moisture can stop the machine from sealing tightly.
Use The Correct Sealing Mode
Set the machine to the right mode for your food. Dry mode works for dry items. Moist mode is best for foods with liquids. Using the wrong mode can cause incomplete seals.
Ensure Proper Lid Closure
Close the lid firmly until it locks. A loose lid stops vacuum pressure. Check if the lid latch clicks in place. A secure lid helps the machine work efficiently.

Credit: www.amazon.com
Frequently Asked Questions
How Do You Use A Foodsaver Vacuum Sealer?
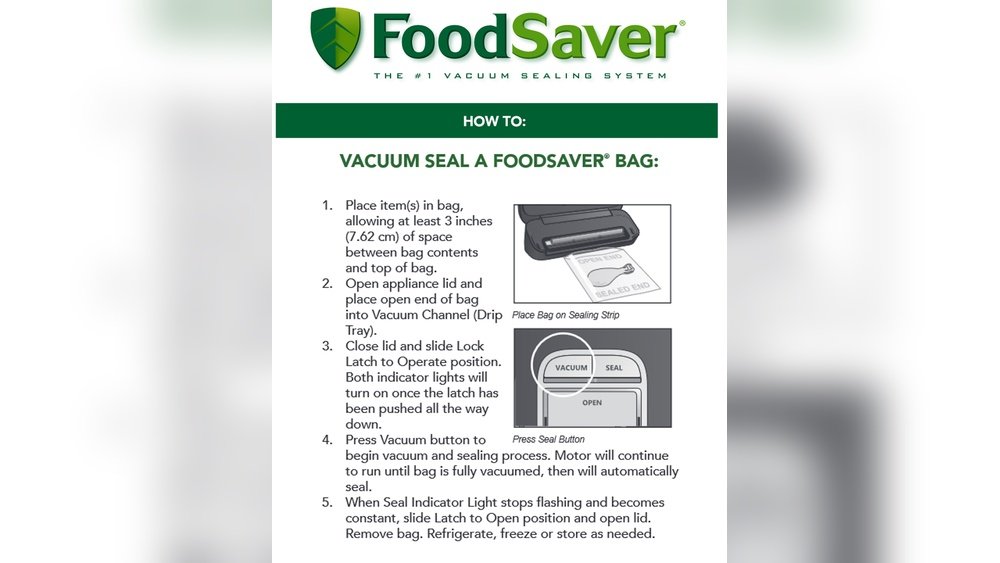
Place food in a FoodSaver bag, insert the open end into the sealer, close the lid, and press the vacuum seal button. Wait until sealing completes, then remove the bag. Store sealed food properly to maintain freshness.
How To Use A Vacuum Sealer Step By Step?
Place food inside the vacuum bag. Insert the bag’s open end into the sealer. Close the lid and lock it. Press the vacuum and seal button. Wait until the machine finishes sealing. Remove the bag and store the vacuum-sealed food properly.
Should I Vacuum Seal Meat On Dry Or Moist?
Vacuum seal meat when it is dry or pat it dry before sealing. Excess moisture can prevent a proper seal and cause freezer burn.
Can Seal-a-meal Prevent Freezer Burn?
Seal-a-Meal vacuum sealers reduce freezer burn by removing air and moisture from bags. This preserves food quality longer.
How Do You Use A Foodsaver Vacuum Sealer?
Place food inside a FoodSaver bag, insert the open end into the machine, and close the lid. Press the vacuum and seal button. The machine removes air and seals the bag tightly.
Conclusion
Using a FoodSaver vacuum sealer keeps food fresh longer and saves space. It is simple to operate with a few easy steps. Seal meats, fruits, and leftovers to avoid waste and freezer burn. Regular cleaning helps your sealer work well every time.
Enjoy fresher meals and better food storage with this tool. Start sealing today and notice the difference in your kitchen.